JoomlaWorks

Member Dashboard
  • Home
  • Extensions
    • Commercial
      • Frontpage Slideshow
      • K2 Plugin for sh404SEF
      • Simple Image Gallery Pro
      • SocialConnect
    • Free
      • K2
      • AllVideos
      • DISQUS Comments for Joomla!
      • IAKI (Import As K2 Image)
      • Quick Menu (for Joomla 4)
      • Simple Image Gallery
      • Simple RSS Feed Reader
    • Free On Github
      • Akismet for Kunena
      • Fill It Up
      • K2 Example Plugin
      • K2 Links for JCE
      • Rebuild K2 Image Cache (CLI utility for K2)
      • TinyLetter Subscribe
      • URL Normalizer
      • User Extended Fields for K2
  • Templates
    • Commercial Templates
      • Anagram
      • Archetype
      • BusinessOne
      • Ibento
      • Janaro
      • Kiji
      • Matchbox
      • nuMuzik
      • RadioWave
      • Toreda
    • Free Templates
      • nuModusVersus
      • Takai
  • Demos
    • Joomla Extension Demos
    • Joomla Template Demos
    • WordPress Plugin Demos
  • Labs
    • Web Apps
      • JSON 2 JSONP
      • Feed Reader (bookmarklet)
      • Device Info
  • Support
    • Documentation for Joomla Extensions
      • AllVideos
      • Frontpage Slideshow
      • Simple Image Gallery
      • Simple Image Gallery Pro
      • SocialConnect
    • Documentation for Joomla Templates
      • General Resources
        • Installation
        • Content
        • Customization
      • Commercial Templates
      • Free Templates
    • Get Help
      • Community Forum
        • Recent Topics
        • Categories
        • Create free account
      • Help Desk
      • Contact us by e-mail
      • Contact us on Facebook Messenger
      • Contact us on Twitter
  • About
    • Blog
    • Company
    • License & Terms of Service
    • Privacy Policy
  • My Account
09 09 2012
Written by  JoomlaWorks
Published in Blog
Tagged under
  • +esxi
  • +expand
  • +extend
  • +fdisk
  • +logical volume
  • +lvextend
  • +lvm
  • +partition
  • +resize
  • +resize2fs
  • +ubuntu
  • +ubuntu server
  • +vmware
  • +vsphere client
17 comments

Resizing the disk space on Ubuntu Server VMs running on VMware ESXi 5

Resizing the disk space on Ubuntu Server VMs running on VMware ESXi 5
We generally do both dedicated and VPS hosting for our websites, apps and some premium projects we run for others.

When we choose to have VPS servers (aka virtual machines or VMs for short) instead of dedicated servers, we usually opt for VMware's free ESXi 5 and install Ubuntu Server as the OS for the VPSs we create on top of ESXi 5. It may not be as friendly as some VPS providers like Amazon, Rackspace etc. but you got more control and it's on YOUR hardware (pretty important actually!)...

Now, when you build a VPS on VMware, you start with say 40GBs of hard disk space. You install the OS, setup the server, move the sites on this new server and you're on. But what happens when there's no more room on the server for your site or sites and you need to add more disk space?

The process is quite simple:

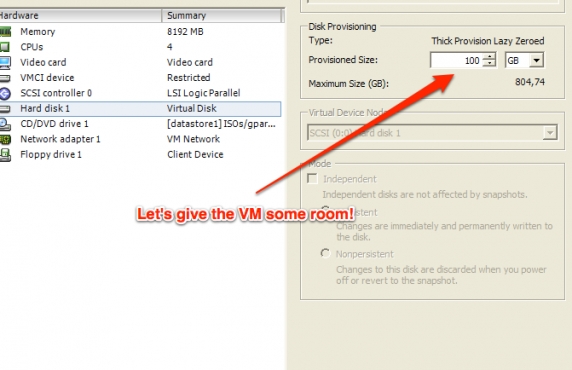
a) Connect to the VMware ESXi 5 server using the vShpere Client. Edit the VM's properties to increase the hard disk size (VM has to be off) - I won't get into details on that, if you have the experience on managing ESXi you know what to do... I'm assuming the process is the same for ESXi 4. Now restart the VM. 

b) Login via SSH to the VM and follow this process.
- First list all partitions:
$ ls -al /dev/sda*

- Create new partition using fdisk:
$ fdisk /dev/sda
Then:
    type p - to list all your partitions
    type n - to create a new partition
    type l - for "logical"
    then give it a number (e.g. if you got 2 partitions listed as /dev/sda1 & /dev/sda2, for the new partition simply type "3" to create /dev/sda3)
    type t - to change the partition type to "Linux LVM"
    provide the partition number you previously created
    type 8e - for the "Linux LVM" type
    type p - to list the new partition table
    type w - to write changes and exit

- Reboot server:
$ reboot

- Assuming you created partition /dev/sda3, let's now create the physical volume in that partition:
$ pvcreate /dev/sda3
 
- Now let's extend the server's Volume Group to that physical volume.
$ vgdisplay
This will give you the info on your current Volume Group. Note down the entry next to "VG Name". That's your Volume Group name. 
$ vgextend EnterVolumeGroupNameHere /dev/sda3

Keep in mind

If you get a message saying /dev/sda3 could not be added to your Volume Group, you need to remove the physical volume and recreate it. Metadata might have gotten corrupt and thus the volume cannot be added to your Volume Group. So just do:
$ pvremove /dev/sda3
And then again:
$ pvcreate /dev/sda3
 
- Since we're (essentially) extending the main logical volume, let's get the name of that:
$ lvdisplay
and note down the entry next to "LV Name". This is your logical volume's name (e.g. /dev/srv/root), which you'll now extend to the newly added partition/physical volume.

- Extend the logical volume by X GBs:
$ lvextend -L +XG yourLogicalVolumeName
Make sure you replace X above with the actual number of GBs you've added in your VM's settings. So if you increased your VM by 20GBs, the command becomes:
$ lvextend -L +20G yourLogicalVolumeName
 
- Finally, let's resize the file system to the new allocated space:
$ resize2fs yourLogicalVolumeName
(this may take some time depending on number of GBs added to the file system.
 
- Check the new file system sizes:
$ df -hT
You should now see an increased disk space for your primary logical volume.
 
- Reboot and you're set :)
Read 309092 times Last modified on Friday, 03 April 2015 00:30

17 comments

  • Babs Babs 05 Aug 2019
    Comment Link

    Just saved lots of headache man. You are a saviour

  • ThatOneGuy ThatOneGuy 24 Sep 2018
    Comment Link

    cfdisk /dev/sda worked for me as well. That GUI is great for the CLI. Ended up solving my problem of "no free sectors available logical partition"

  • argelast argelast 31 May 2017
    Comment Link

    If the installation din't use LVM, tried GParted from the installation if its graphical, or use a live CD, if not you are f...

  • Rigoberto Matias Rigoberto Matias 25 Apr 2017
    Comment Link

    Hi there,
    Good instruction but its not working for me. I created a VM of 40 GB of hard disk. Then I was running out of space, so I decided to increase the the hard disk by 20GB. I followed your instruction here but nothing seems to work. Is there any way you can help me on how to update this server. Thanks

  • Whoa Whoa 04 Feb 2017
    Comment Link

    As of Ubuntu 14.04 where you list "yourLogicalVolumeName" it requires a path (eg /dev/-vg/root). If you use the path then your instructions are still valid.

    Nice write up!

  • SplunkDavid SplunkDavid 25 Jan 2017
    Comment Link

    This guide didn't end up working out for me. The original Ubuntu install did not use volume groups at all - which meant that vgdisplay and lvdisplay gave no output (yes, even after installing lvm2). I thought it was an issue the command not working properly until I realized that the original volume wasn't lvm at all.

    I'm not sure if there was a way to do this live in my particular instance - I ended up calling on a friend who is much better versed in Linux administration, and we couldn't figure out a way to do it. Just thought I should share that in case others have similar issues in the future.

  • alfayo alfayo 19 Dec 2016
    Comment Link

    you are a genius. Thanks man ;-)

  • Mike Baker Mike Baker 29 Jul 2016
    Comment Link

    Awesome write up, helped me, Just one thing for others who had the same issue I had.
    fdisk /dev/sda did not see the additional space, eventually I tried
    cfdisk /dev/sda and then I could see the space.

    This is on Ubuntu, so Ebonweaver, this is for you.

    Hope it helps someone else out there,

    Thanks

  • Ebonweaver Ebonweaver 23 Mar 2016
    Comment Link

    No good sadly, pvdisplay and lvdisplay show nothing. Also worth noting these tools were not installed before installing lvm2. These tools and methods work on Redhat, but not on Ubuntu.

  • tdiet tdiet 10 Mar 2016
    Comment Link

    With Ubuntu 14.04.4 LTS I used GParted to create a new primary partition; rebooted.
    With the last 4 commands I had to replace Name by Path, because lvextend and resize2fs need a LogicalVolumePath.

  • Niklas Niklas 05 Jan 2016
    Comment Link

    THANK YOU! It's a horrible thing to do just to increase a harddisk which is added in vSphere. I didn't found a solution in the net but this finally worked

  • toxiicdev.net toxiicdev.net 06 Nov 2015
    Comment Link

    Thank you mate, the only working tutorial I found on the internet!

  • DaveH DaveH 01 Nov 2015
    Comment Link

    This article assumes that you selected LVM when you first installed your Ubuntu system. If you didn't then this technique won't work.

  • apacph apacph 07 Oct 2015
    Comment Link

    really good documentation.

  • Rups Waqa Rups Waqa 11 May 2015
    Comment Link

    Well documented steps, Good Job!

  • DaveJ DaveJ 11 Apr 2015
    Comment Link

    This worked beautifully for me when I extended the disk space from 20G to 40G. Months later, I needed to extend again to 80G. However, now when I I try to create a new partition, I get:
    All primary partitions are in use
    Adding logical partition 6
    No free sectors available

  • Bosire Bosire 27 Mar 2013
    Comment Link

    It worked very well for me. Thanx

Leave a comment

Make sure you enter all the required information, indicated by an asterisk (*). HTML code is not allowed.

back to top
BY MAIL BY RSS

Archives

  • May 2024 (1)
  • March 2023 (1)
  • January 2022 (1)
  • July 2021 (2)
  • May 2021 (1)
  • February 2021 (1)
  • December 2020 (1)
  • September 2020 (1)
  • June 2020 (1)
  • May 2020 (1)
  • February 2020 (1)
  • January 2020 (5)

Tag Cloud

allvideos announcement apache community development frontpage slideshow future joomla k2 Performance plugin release sh404sef simple image gallery simple image gallery pro simple rss feed reader socialconnect tips update video

Latest Entries

  • K2 will not be made available for Joomla 4/5 - change of course
    Written by  JoomlaWorks
    30 May 2024
  • New free extension release: Quick Menu (for Joomla 4)
    Written by  JoomlaWorks
    06 Mar 2023
  • Simple Image Gallery (free) v4.2 released
    Written by  JoomlaWorks
    07 Jan 2022
  • Simple Image Gallery Pro v3.9.1 released (bug-fix release)
    Written by  JoomlaWorks
    26 Jul 2021
  • Simple Image Gallery Pro v3.9.0 released
    Written by  JoomlaWorks
    05 Jul 2021

Join Our Newsletter

Enter your e-mail address to subscribe to our new or updated product notifications. We send combined newsletters, so we won't spam you every week :)

Get Social

  • Twitter
  • GitHub
  • Facebook
  • GitHub (K2)
  • YouTube
  • Speaker Deck

Grab Our Feeds

  • Extension Updates
  • Blog
  • Videos
  • Presentations
Copyright © 2006 - 2025 JoomlaWorks Ltd.
JoomlaWorks Ltd. and this site is not affiliated with or endorsed by The Joomla! Project™. Any products and services provided through this site are not supported or warrantied by The Joomla! Project or Open Source Matters, Inc. Use of the Joomla!® name, symbol, logo and related trademarks is permitted under a limited license granted by Open Source Matters, Inc.
designed by Nuevvo