Basic System Requirements
- PHP version 5.5.x or newer
- cURL & JSON modules for PHP (usually installed by default in most hosting providers)
- Joomla versions 1.5, 2.5 or 3.x
You can check the system requirements anytime by visiting the SocialConnect Dashboard page.
Further requirements
SocialConnect integrates the most popular social networks in your Joomla website. These networks require some setup on their side to allow you to use their services:
- Facebook integration: Please have a look at the updated documentation here: https://docs.joomlaworks.net/#/pages/socialconnect/facebook
- Twitter integration: In order to allow users to login to your site using their Twitter account you need to create a Twitter application. Read the “Creating a Twitter App” section of this document for more information. In addition, since version 1.5, SocialConnect allows you to create tweets of your site content to a specified Twitter user timeline. In order to enable this feature you need to authorize your Twitter application. You can read the “Authorizing your Twitter application” section of this document for more information.
- Google integration: In order to allow users to login to your site using their Google account you need to create a Google application. Read the “Creating a Google Application” section of this document for more information.
- LinkedIn integration: In order to allow users to login to your site using their LinkedIn account you need to create a LinkedIn application. Read the “Creating a LinkedIn Application” section of this document for more information. In addition, since version 1.8, SocialConnect allows you to post your site content to a specified LinkedIn user timeline. In order to enable this feature you need to authorize your LinkedIn application. You can read the “Authorizing your LinkedIn application” section of this document for more information.
- GitHub integration: In order to allow users to login to your site using their GitHub account you need to create a GitHub application. Read the “Creating a GitHub Application” section of this document for more information.
- WordPress.com integration: In order to allow users to login to your site using their WordPress.com account you need to create a WordPress application. Read the “Creating a WordPress Application” section of this document for more information.
- Microsoft integration: In order to allow users to login to your site using their Microsoft account (this includes Outlook.com, Hotmail, Windows Live, SkyDrive, Windows Phone and Xbox Live accounts) you need to create a Microsoft application. Read the “Creating a Microsoft Application” section of this document for more information.
- Instagram integration: As of June 29th 2020, the relevant Instagram API has been deprecated by Facebook (owners of Instagram) in favour of Facebook Login (read the related statement here). Existing integrations will not be supported after September 2020 so SocialConnect after v1.10.0 will remove the related options for Instagram.
- Foursquare integration: In order to allow users to login to your site using their Foursquare account you need to create a Foursquare application. Read the “Creating a Foursquare Application” section of this document for more information.
- Amazon integration: In order to allow users to login to your site using their Amazon account you need to create an Amazon application. Read the “Creating an Amazon Application” section of this document for more information.
- StackExchange integration: In order to allow users to login to your site using their StackExchange account (this includes stackoverflow.com and all the StackExchange sites listed at http://stackexchange.com/sites ) you need to create a StackExchange application. Read the “Creating a StackExchange Application” section of this document for more information.
- SoundCloud integration: In order to allow users to login to your site using their SoundCloud account you need to create a SoundCloud application. Read the “Creating a SoundCloud Application” section of this document for more information.
- Tumblr integration: In order to allow users to login to your site using their Tumblr account you need to create a Tumblr application. Read the “Creating a Tumblr Application” section of this document for more information.
- DISQUS integration: In order to integrate DISQUS comments to your site you need to have a DISQUS account. In order to allow users to log in to our site using their DISQUS account you need to create a DISQUS application. Read the “Creating a DISQUS Application” section of this document for more information.
Installation - Upgrade
To install SocialConnect simply use Joomla Extension installer and install it like any other extension.
To upgrade SocialConnect just install the new version on top of the old one (do not uninstall the old one so your setup & authorization/keys remain intact).
Settings
All SocialConnect settings are located under the administration component. Settings are divided in the following groups:
- Social Login Settings
- Social Comments Settings
- Social Auto Post Settings
- Advanced Settings
- System Settings
- Permissions (for Joomla 2.5+)
Social Login Settings
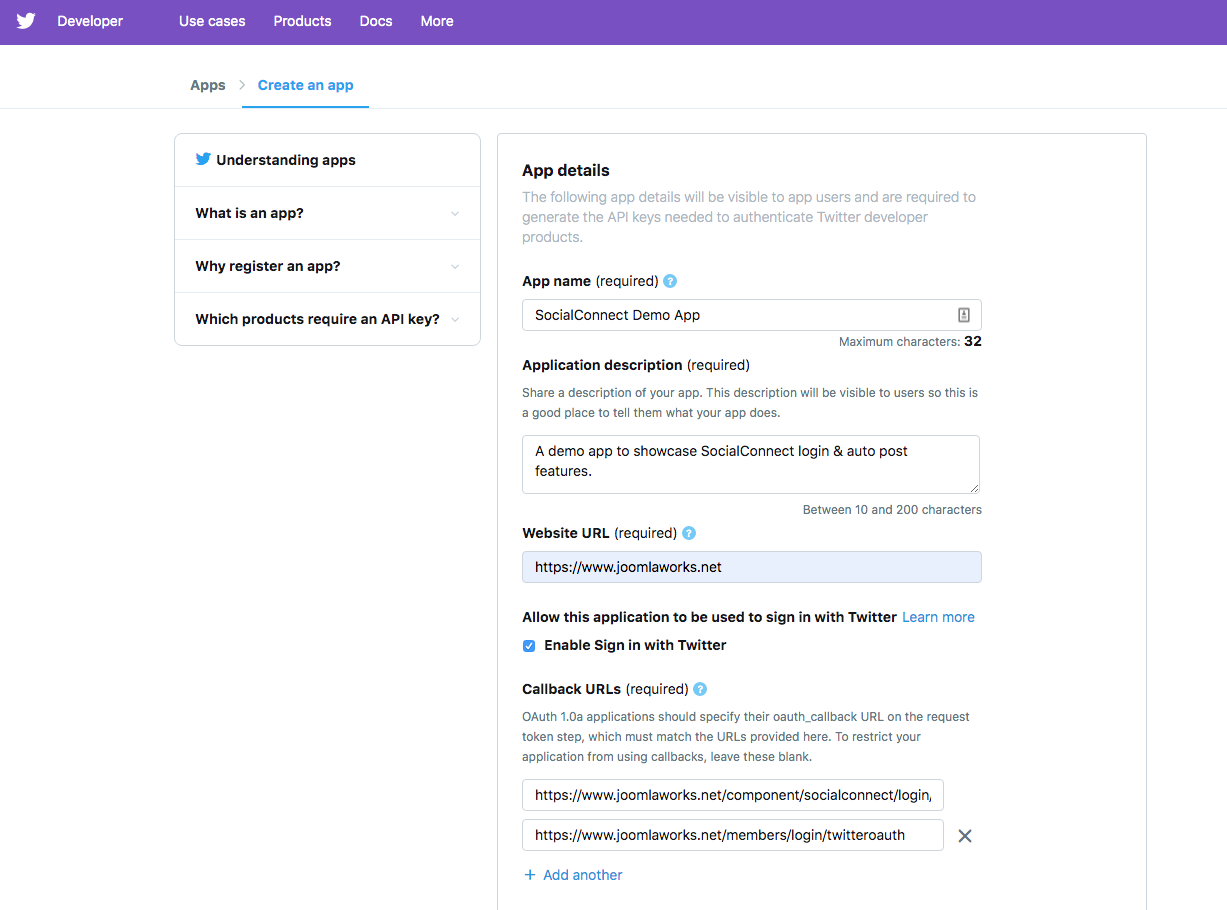
Go to https://developer.twitter.com/ and sign in using your Twitter account. Then visit https://developer.twitter.com/en/apps/create and you will be transferred to the “Create an app” form/page.
Fill in all required fields and make sure you click on "Enable Sign in with Twitter" for logins to work. Under "Callback URLs" you need to add at the following set of SEF-only URLs:
- https://domain.tld/component/socialconnect/login/twitteroauth
- https://domain.tld/administrator/index.php
- https://domain.tld/administrator/
If you have created a menu item pointing to the SocialConnect login form (e.g. https://domain.tld/socialconnect) you also need to add https://domain.tld/socialconnect/login/twitteroauth (basically your SocialConnect menu URL plus "/login/twitteroauth") to the list of callback URLs.
If your site uses HTTP and not HTTPS, adjust all URLs above accordingly. Non SEF URLs won't work, so you need to enable SEF URLs in Joomla.
Additionally, make sure you provide a valid reason why you're creating an app under "Tell us how this app will be used". Apps are now passed through inspection so the more info you provide the less risky it is to have your app declined.
Once your app is ready/approved, head over to you app on Twitter, switch to the "Keys and tokens" tab and copy the 2 keys from "Consumer API keys" (api key & api secret key) into “Consumer key” and “Consumer secret” respectively in SocialConnect's Settings.
In order to enable Google login to your site you need to create a Google application and provide SocialConnect the following settings:
- Client ID. This the client ID of your Google application.
- Client secret. This is the client secret of your Google application.
Both of the above can be found on your Google application page. If you are not familiar with Google Applications then read the following section which provides a step-by-step process for creating one.
Creating a Google Application
First go to https://console.developers.google.com and sign in using your Google account. After that open the dropwdown list on the upper right part of the screen which is populated with your current projects. You should see a link in the list named “Create a project....” . Click on that and then you will be asked to give a name to your project. After you do so, click the “Create” button. Then you will be transfered to the project dashboard page. Click on the block named "Use Google APIs" and on the next screen use the menu on the left and click the link named "Credentials". On the next screen click on the "New credentials" button and choose "oAuth client ID" from the dropdown. Choose "Web application" as "application type" and provide your site's URL to the field "Authorized JavaScript origins". In the field "Authorized redirect URIs" enter the following:
YOUR_SITE_URL/index.php?option=com_socialconnect&view=login&task=googleoauth.
After that click on the "Create client ID" button and you are done.
You are ready to go now. Just provide the Client ID and Client secret of your application to SocialConnect.
Below is a typical Google application setup for SocialConnect: 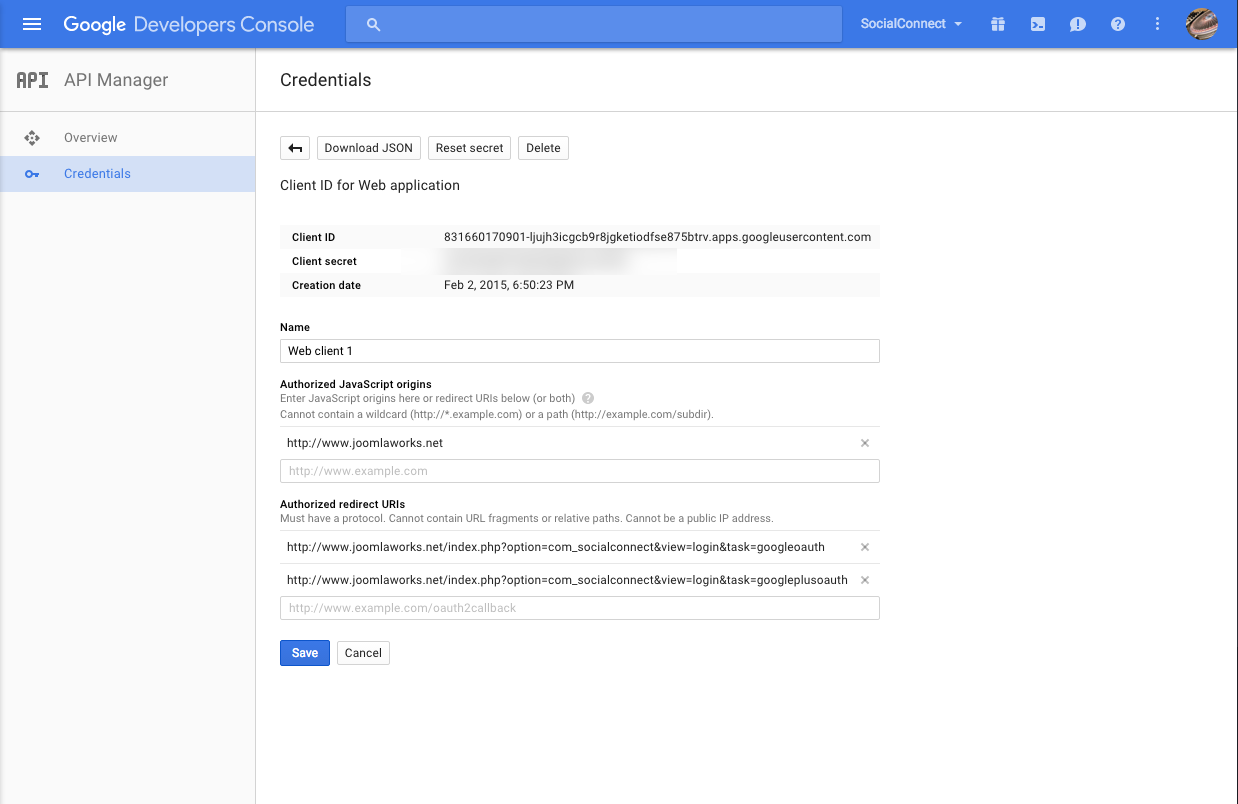
In order to enable LinkedIn login to your site you need to create a LinkedIn application and provide SocialConnect the following settings:
- API key. This the API key of your LinkedIn application.
- API secret. This is the API secret of your LinkedIn application.
Both of the above can be found on your LinkedIn application page. If you are not familiar with LinkedIn Applications then read the following section which provides a step-by-step process for creating one.
Creating a LinkedIn Application
Go to https://www.linkedin.com/developers/apps and sign in using your LinkedIn account. Then create a new app (use https://www.linkedin.com/developers/apps/new). Fill in the form (make sure "Share on LinkedIn" and "Sign In with LinkedIn" are already chosen under "Products") and click on "Create app" at the bottom of the page.
Once the app is created, your API keys are in the "Auth" tab of your app. To finalize the process, you need to add the following Redirect URL(s) under "OAuth 2.0 settings" for LinkedIn login and autoposting:
- https://domain.tld/administrator/index.php?option=com_socialconnect&view=authorize&service=linkedin
- https://domain.tld/component/socialconnect/login/linkedinoauth
- https://domain.tld/index.php?option=com_socialconnect&view=login&task=linkedinoauth
If you have a menu item pointing to the SocialConnect login form with "socialconnect" as the menu item alias then also add https://domain.tld/socialconnect/login/linkedinoauth to the list of URLs in your LinkedIn's app settings (basically your SocialConnect menu URL plus "/login/linkedinoauth").
If you have followed the steps described above, you should now be able to use LinkedIn login & autoposting in your site!
Please note that existing LinkedIn apps using v1 of their API will work for some time to come, but new apps registered will only utilize v2 of their API. Additionally, if you are using SocialConnect v1.9.0+, you need to update your Redirect URL(s) under "OAuth 2.0 settings" to NOT useparameters as described above.
GitHub
In order to enable GitHub login to your site you need to create a GitHub application and provide SocialConnect the following settings:
- Client ID. This the client ID of your GitHub application.
- Client secret. This is the client secret of your GitHub application.
Both of the above can be found on your GitHub application page. If you are not familiar with GitHub Applications then read the following section which provides a step-by-step process for creating one.
Creating a GitHub Application
First go to https://github.com and sign in using your GitHub account. After that click the “Settings” icon on the upper right menu. This will navigate you to your account settings page. Then you need to click the "Applications" link of the menu on the left and in the next screen you will see a button named "Register new application". Once you click it you will see the application page. You are asked there to give a name to your application. You can give whatever name you want. This is what users will see when they attempt to sign in to your site using GitHub. Next you need to provide a "Homepage URL" and an "Authorization callback URL" . Type in both these inputs the URL of your site. Finally click the "Register application" button to complete the proccess. Below is a typical GitHub application setup for SocialConnect: 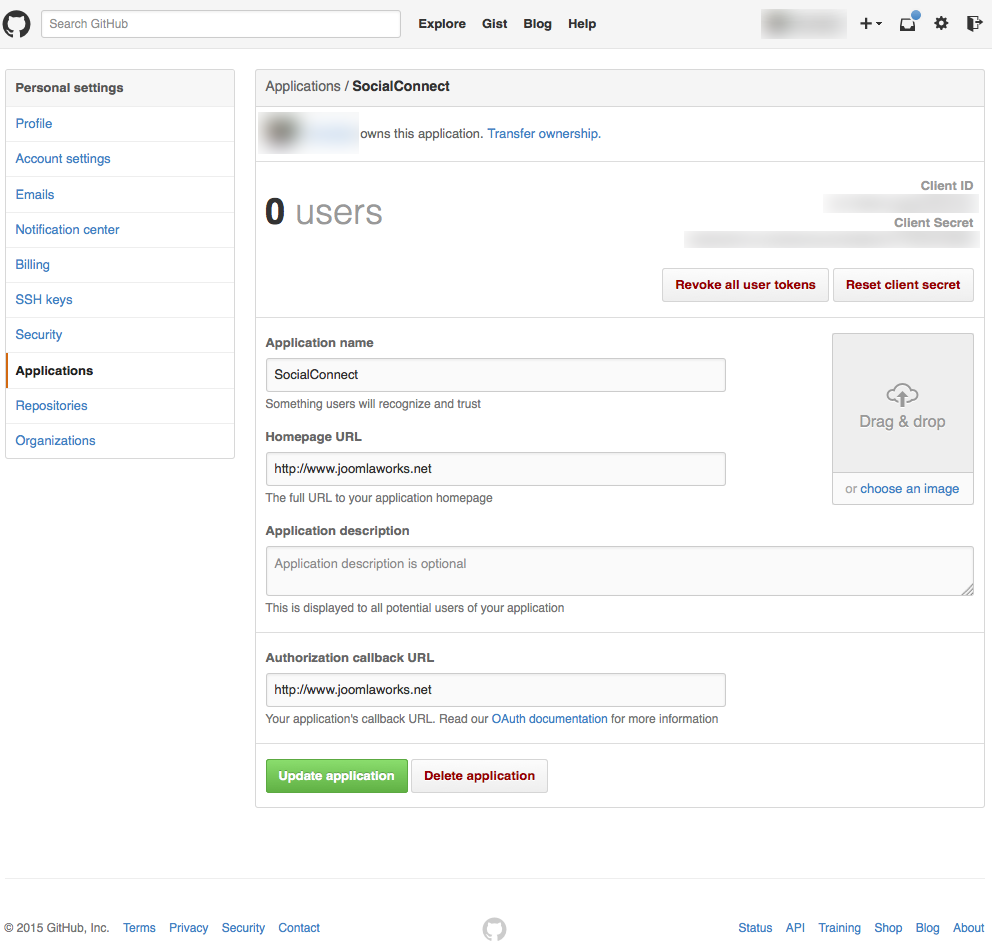
WordPress
In order to enable WordPress login to your site you need to create a WordPress application and provide SocialConnect the following settings:
- Client ID. This the client ID of your WordPress application.
- Client secret. This is the client secret of your WordPress application.
Both of the above can be found on your WordPress application page. If you are not familiar with WordPress Applications then read the following section which provides a step-by-step process for creating one.
Creating a WordPress Application
First go to http://developer.wordpress.com/apps/ and sign in using your WordPress account. Once you do so click the button named "Create New Application". In the form that appears type the name of your site in the field "Name". You also need to fill in the "Website URL" and the "Redirect URI" fields. Type there the URL of your site and ensure that the type of the application is set to "Web". Finally click the "Create" button. Your application should be ready now. Below is a typical WordPress application setup for SocialConnect: 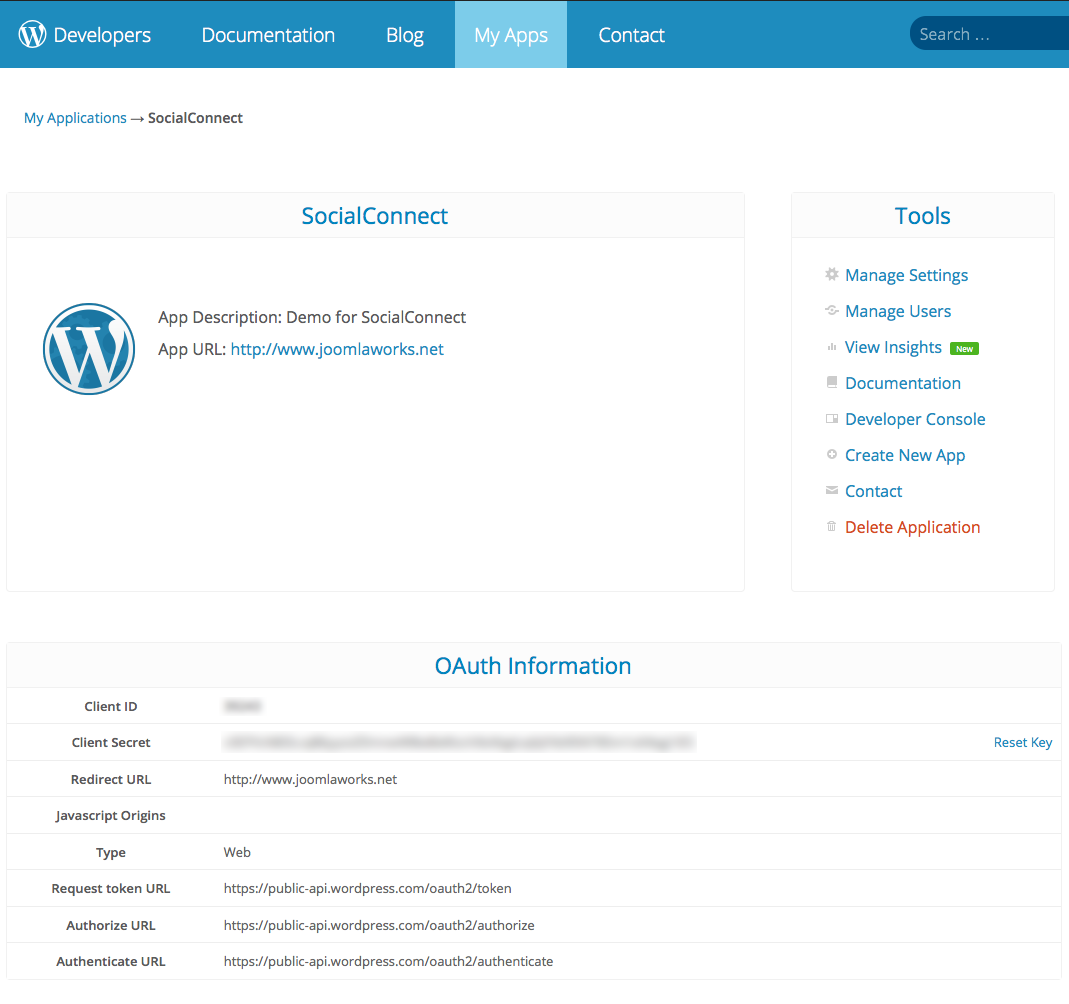
Microsoft
In order to enable Microsoft login to your site you need to create a Microsoft application and provide SocialConnect the following settings:
- Client ID. This the client ID of your Microsoft application.
- Client secret. This is the client secret of your Microsoft application.
Both of the above can be found on your Microsoft application page. If you are not familiar with Microsoft Applications then read the following section which provides a step-by-step process for creating one.
Creating a Microsoft Application
First go to https://account.live.com/developers/applications/index and sign in using your Microsoft account. Once you do so click the link named "Create application" and in the next screen type a name for your application in the field named "Application name" ( you can type your site name here). After accepting the terms of use you will be redirected to the application setup page. There you need to enter the URL of your site to the field named "Root domain".
Microsoft also requires the exact redirect URLs to be entered in the application settings, not just the domain. On top of that, those URLs should not contain any query strings. This means that the redirect URL should be set to "http://www.yoursite.com/component/socialconnect/login/windowsoauth" or "http://www.yoursite.com/index.php/component/socialconnect/login/windowsoauth" depending on the SEF settings of your site. We also need to also take care of SSL, so the URL could also be "https://www.yoursite.com/index.php/component/socialconnect/login/windowsoauth" .
Finally, ensure that the radio button "Mobile client app" is set to "no" and click the "save" button. Your application should be ready now. Below is a typical Microsoft application setup for SocialConnect: 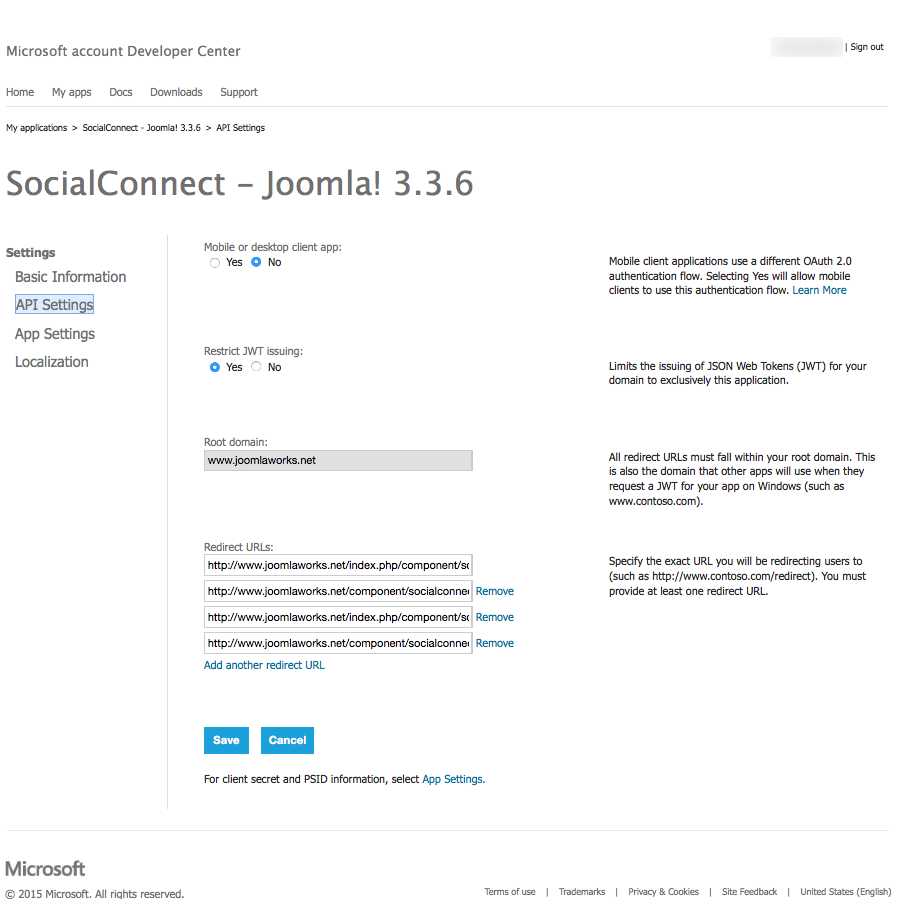
Foursquare
In order to enable Foursquare login to your site you need to create a Foursquare application and provide SocialConnect the following settings:
- Client ID. This the client ID of your Foursquare application.
- Client secret. This is the client secret of your Foursquare application.
Both of the above can be found on your Foursquare application page. If you are not familiar with Foursquare Applications then read the following section which provides a step-by-step process for creating one.
Creating a Foursquare Application
Visit https://developer.foursquare.com/ and sign in using your account. Click on the "My apps" link of the menu on the top and on the next screen click on the "CREATE A NEW APP" button on the right. Enter a name for the application and type your site's URL to the fields "" and "" . In the field "" enter the following URL:
YOUR_SITE_URL/index.php?option=com_socialconnect&view=login&task=foursquareoauth.
Finally provide the "" and "Detailed description" fields and click on the "SAVE CHANGES" button. Below is a typical application setup for use with SocialConnect: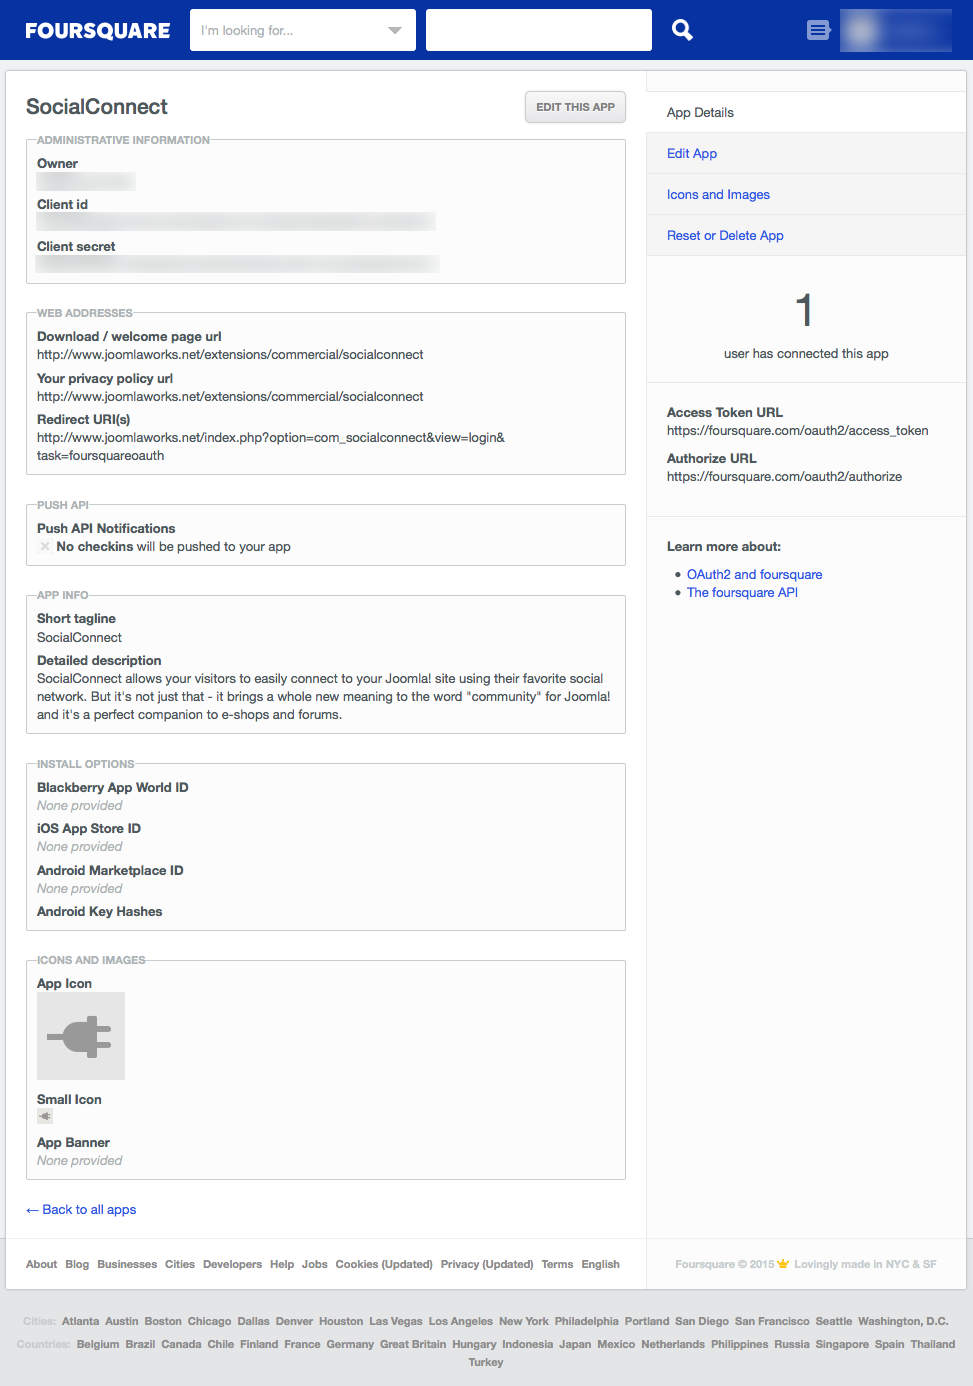
Amazon
In order to enable Amazon login to your site you need to create an Amazon application and provide SocialConnect the following settings:
- Client ID. This the client ID of your Amazon application.
- Client secret. This is the client secret of your Amazon application.
Both of the above can be found on your Amazon application page. If you are not familiar with Amazon Applications then read the following section which provides a step-by-step process for creating one.
Creating an Amazon Application
Navigate to http://login.amazon.com/app-console-login and sign in using your account. After that click on the "Register new application" button on the right part of the screen. Enter a name and a description for the application and type your website URL in the "Privacy Notice URL" and click "save" . In the next screen click on the "Web settings" and after that on the "edit" button. In the field named "Allowed Return URLs" add the following URL:
YOUR_SITE_URL/index.php?option=com_socialconnect&view=login&task=amazonoauth.
Note that Amazon requires a secure URL. . This means that your site should be accessible over https.
Finally click on the "Save" button and you are ready to go. This is a typical application setup for use with SocialConnect: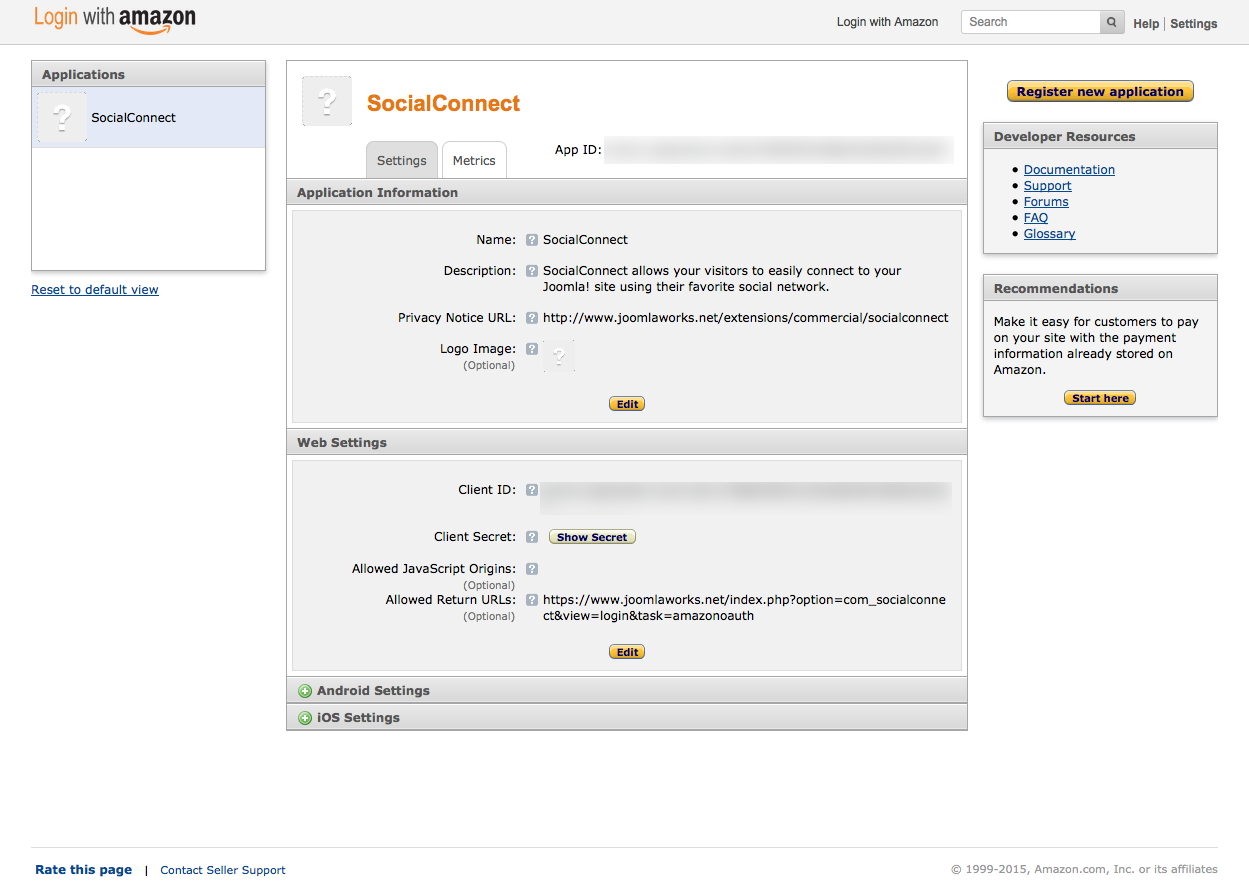
DISQUS
In order to enable DISQUS login to your site you need to create a DISQUS application and provide SocialConnect the following settings:
- API key. This is the API key of your DISQUS application.
- API secret. This is the API secret of your DISQUS application.
Both of the above can be found on your DISQUS application page. If you are not familiar with DISQUS Applications then read the following section which provides a step-by-step process for creating one.
Creating a DISQUS Application
Visit https://disqus.com/api/applications/ and sign in using your account. Click on the "Register new application" button on the right. Fill in all the fields and click on the "Register my application" button. After that you will get redirected to the settings page of the application you just created. Enter your site's domain in the "Domains" field and in the field named "" enter the following URL:
YOUR_SITE_URL/index.php?option=com_socialconnect&view=login&task=disqusoauth.
Finally, click on the "Save Changes" button. You can find the required keys in the "details" page of your application. Below is a typical application setup for use with SocialConnect: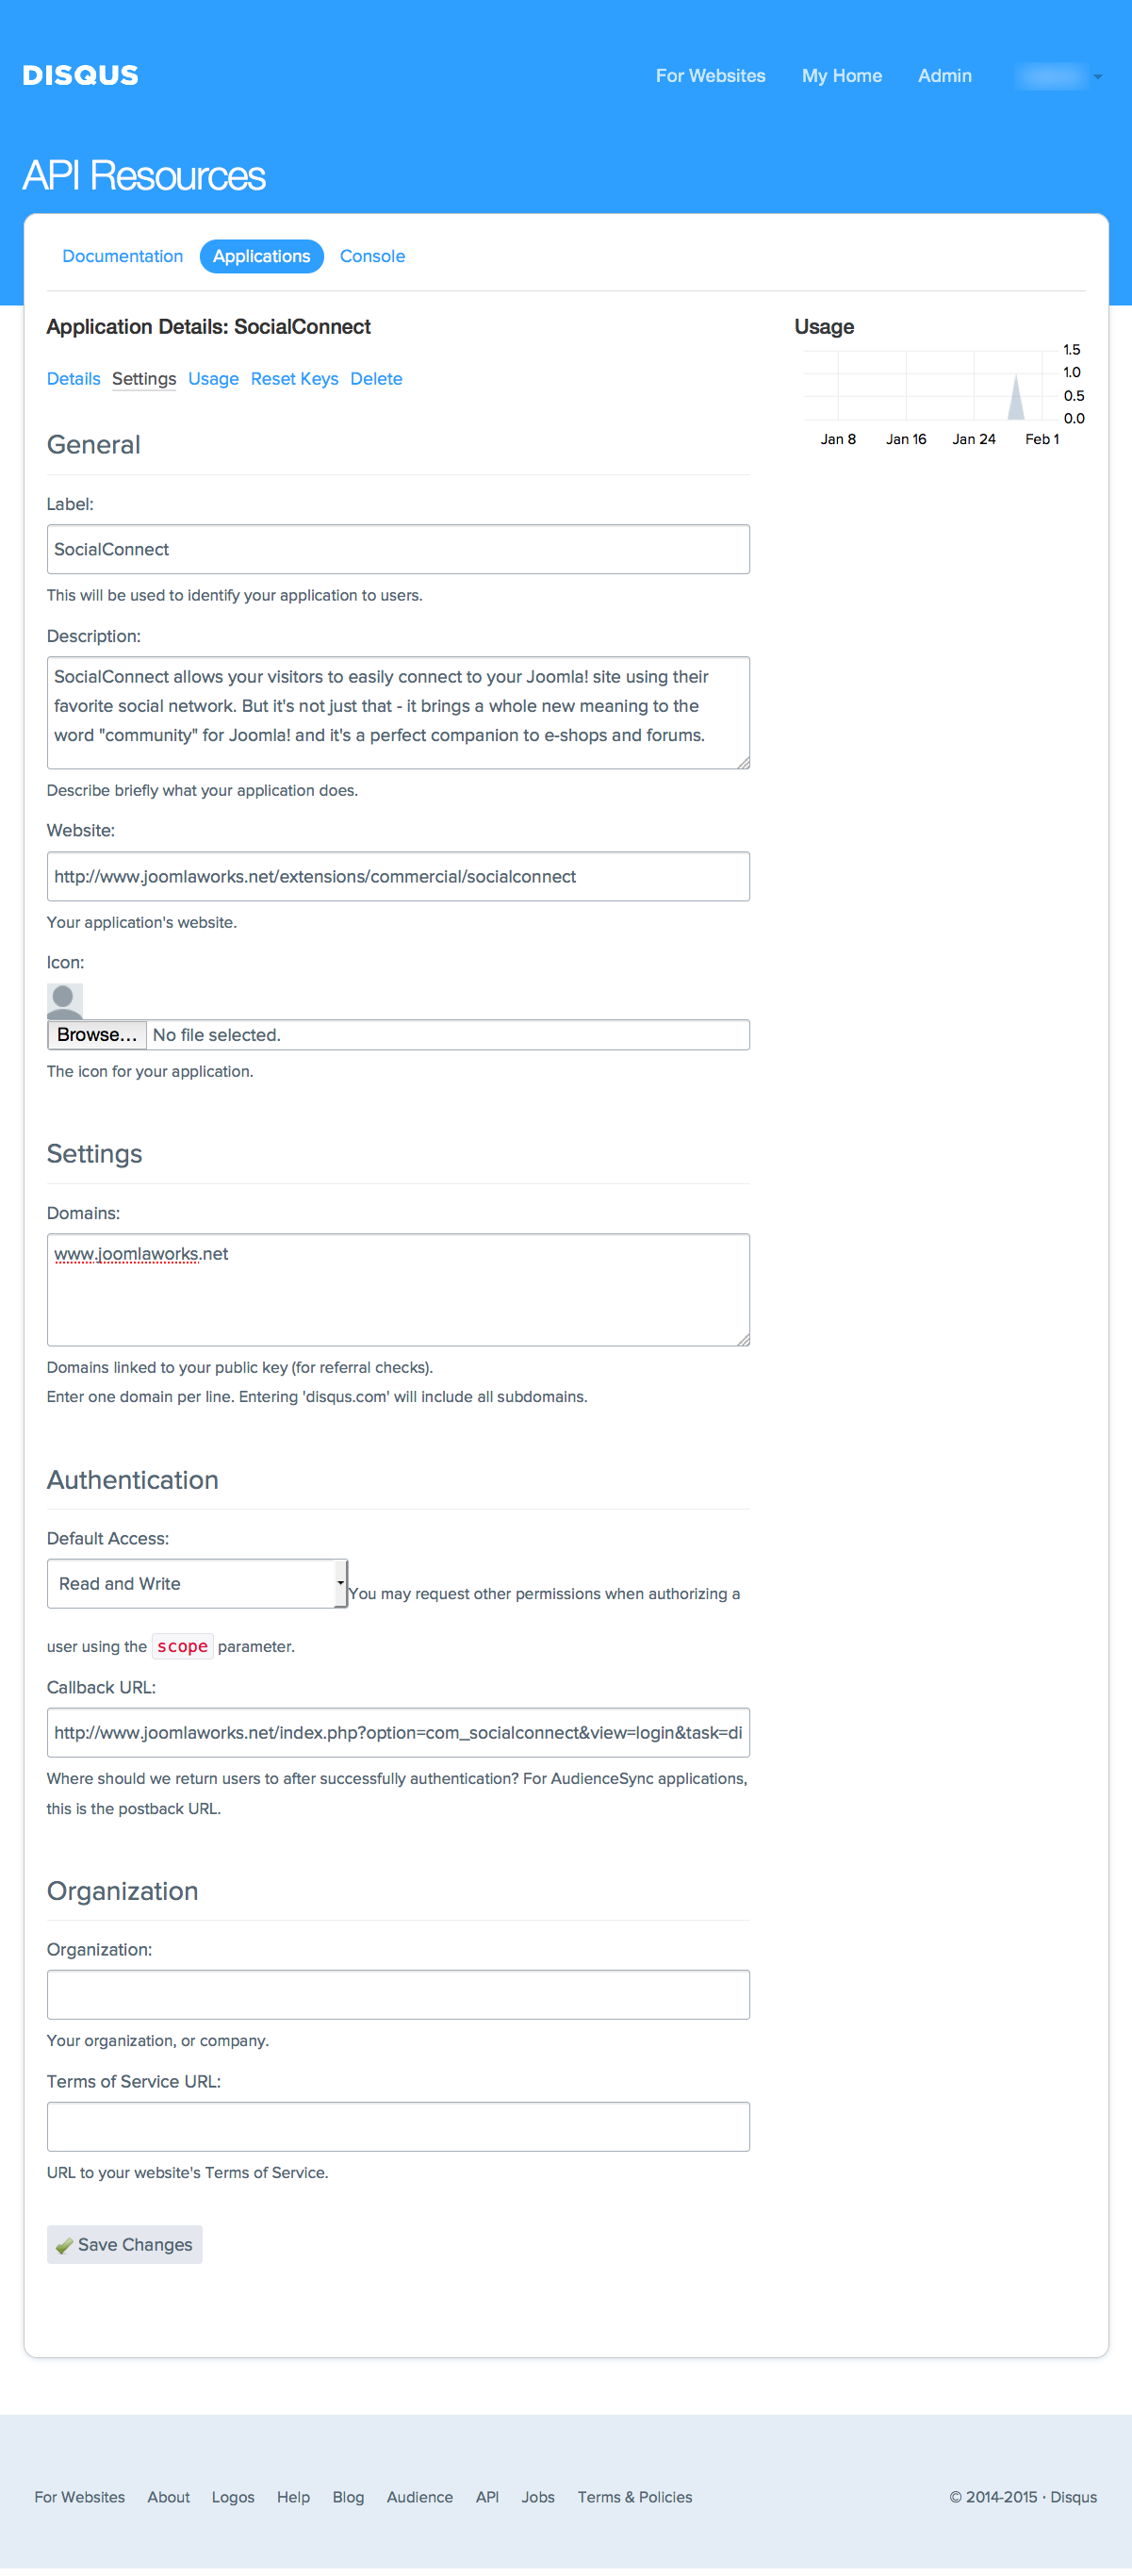
StackExchange
In order to enable StackExchange login to your site you need to create a StackExchange application and provide SocialConnect the following settings:
- Client ID. This is the Client ID of your StackExchange application.
- Client secret. This is the API secret of your StackExchange application.
- Key. This is the Key of your StackExchange application.
- Site. Here you select the StackExchange ( StackOverflow for example ) site for which you want to enable login on your site.
Both of the above can be found on your StackExchange application page. If you are not familiar with StackExchange Applications then read the following section which provides a step-by-step process for creating one.
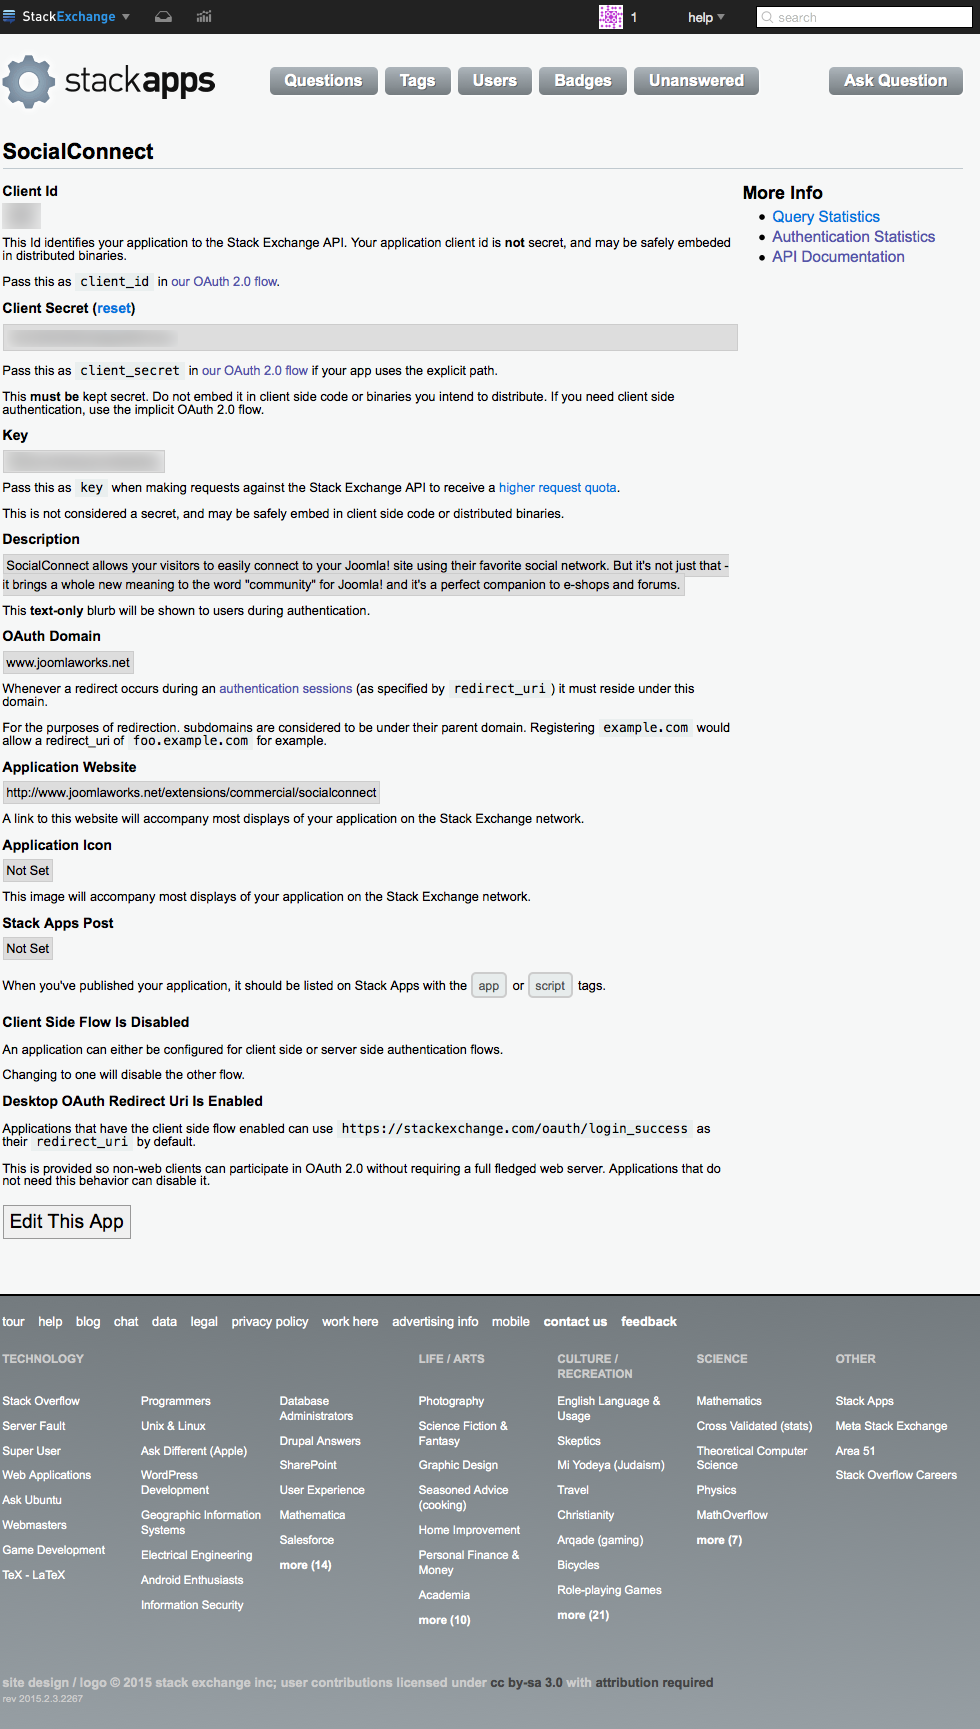
Creating a StackExchange Application
Visit http://stackapps.com/apps/oauth/register and sign in using your account. Fill in name, description and website fields and in the field named "oAuth Domain" enter your site's domain.
Finally, click on the "Register Your Application" button and you are ready to go. Just remember that after entering the client id and the client secret to SocialConnect settings page you also need to select one of the StackExchange sites listed there. Below is a typical application setup for use with SocialConnect:
Tumblr
In order to enable Tumblr login to your site you need to create a Tumblr application and provide SocialConnect the following settings:
- Consumer key. This the consumer key of your Tumblr application.
- Consumer secret. This is the consumer secret of your Tumblr application.
Both of the above can be found on your Tumblr application page. If you are not familiar with Tumblr Applications then read the following section which provides a step-by-step process for creating one.
Creating a Tumblr Application
First go to https://www.tumblr.com/oauth/apps and sign in using your Tumblr account. After that click on the "Register application" button. Fill in all the fields that are required. In the field named "Default callback URL" you need to enter the following value: YOUR_SITE_URL/index.php?option=com_socialconnect&view=login&task=tumblroauth . Finally click the "Register" button to save your application. You are ready to go now. Just provide the Consumer key and Consumer secret of your application to SocialConnect.
Below is a typical Tumblr application setup for SocialConnect: 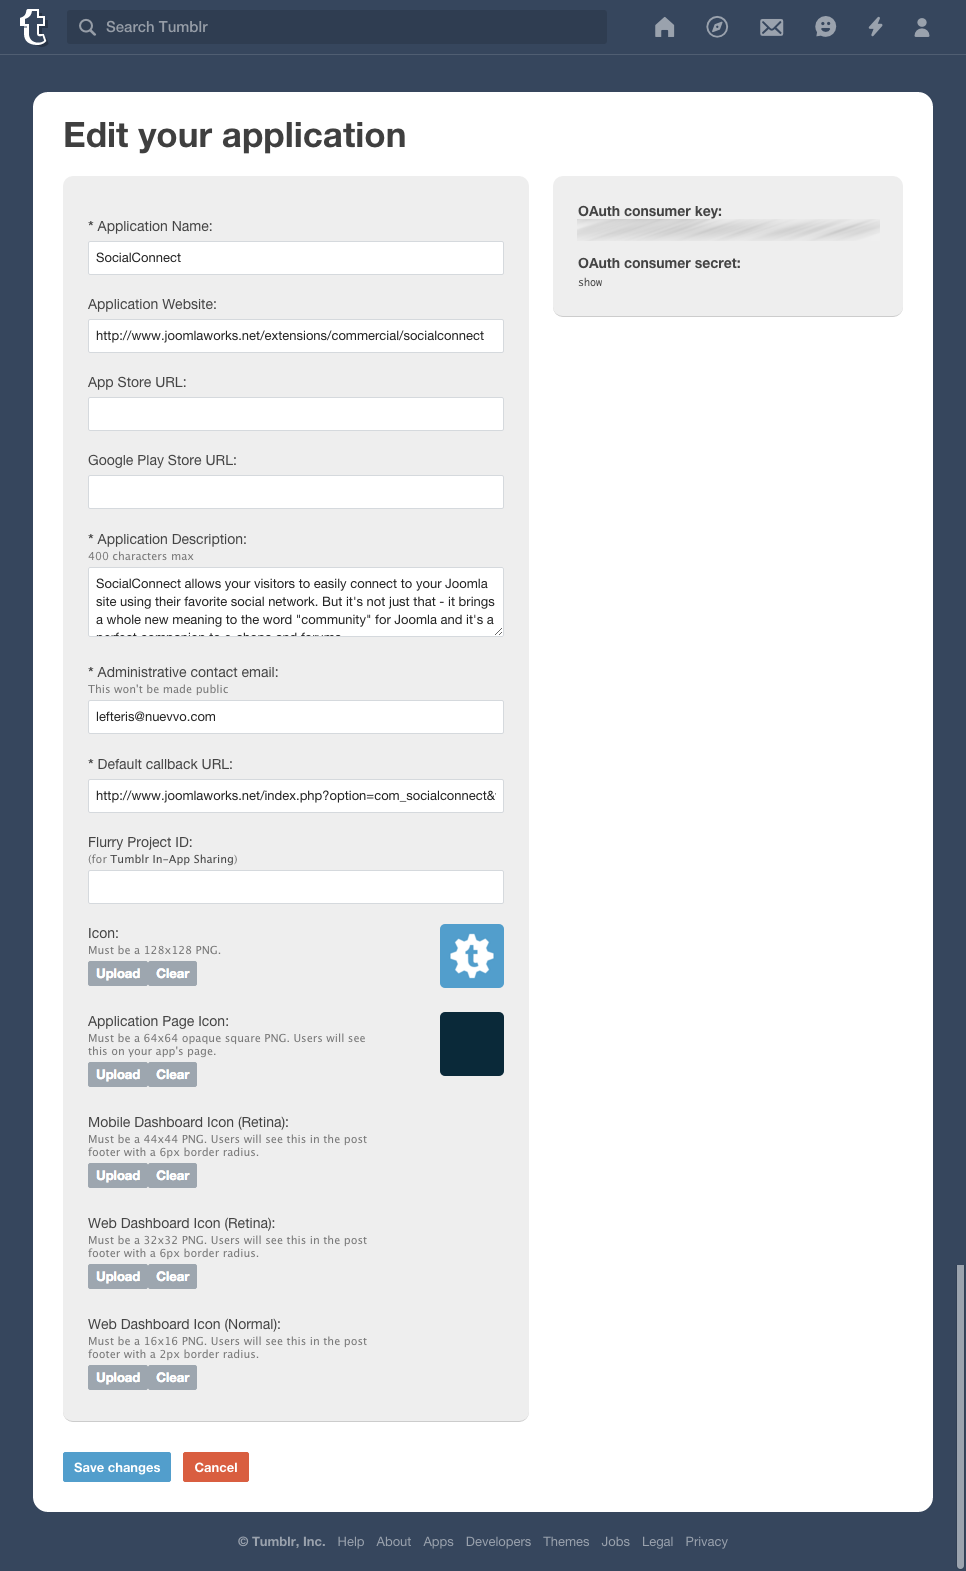
SoundCloud
In order to enable SoundCloud login to your site you need to create a SoundCloud application and provide SocialConnect the following settings:
- Client ID. This the client ID of your SoundCloud application.
- Client secret. This is the client secret of your SoundCloud application.
Both of the above can be found on your SoundCloud application page. If you are not familiar with SoundCloud Applications then read the following section which provides a step-by-step process for creating one.
Creating a SoundCloud Application
First go to https://developers.soundcloud.com and sign in using your SoundCloud account. After that navigate to http://soundcloud.com/you/apps and click on the "Register a new application" button. Then you will get prompted to give a name to your application. Give something meaningful (like your brand name) and click on the "Register" button. In the next screen, provide the following options:
- Website of your app: Enter the URL of your website
- Redirect URI for Authentication: SoundCloud only accepts SEF URLs in this field. This means that you should have enabled the SEF URLs under Joomla configuration. Depending on your configuration, the value that you need to enter here is one of the following:
- http://YOUR_SITE_URL/index.php/component/socialconnect/login/soundcloudoauth?Itemid=
- http://YOUR_SITE_URL/index.php/component/socialconnect/login/soundcloudoauth.html?Itemid=
- http://YOUR_SITE_URL/component/socialconnect/login/soundcloudoauth?Itemid=
- http://YOUR_SITE_URL/component/socialconnect/login/soundcloudoauth.html?Itemid=
Pick the one that matches with your SEF URLs options.
Finally click the "Save app" button to save your application. You are ready to go now. Just provide the Client ID and Client secret of your application to SocialConnect.
Below is a typical SoundCloud application setup for SocialConnect: 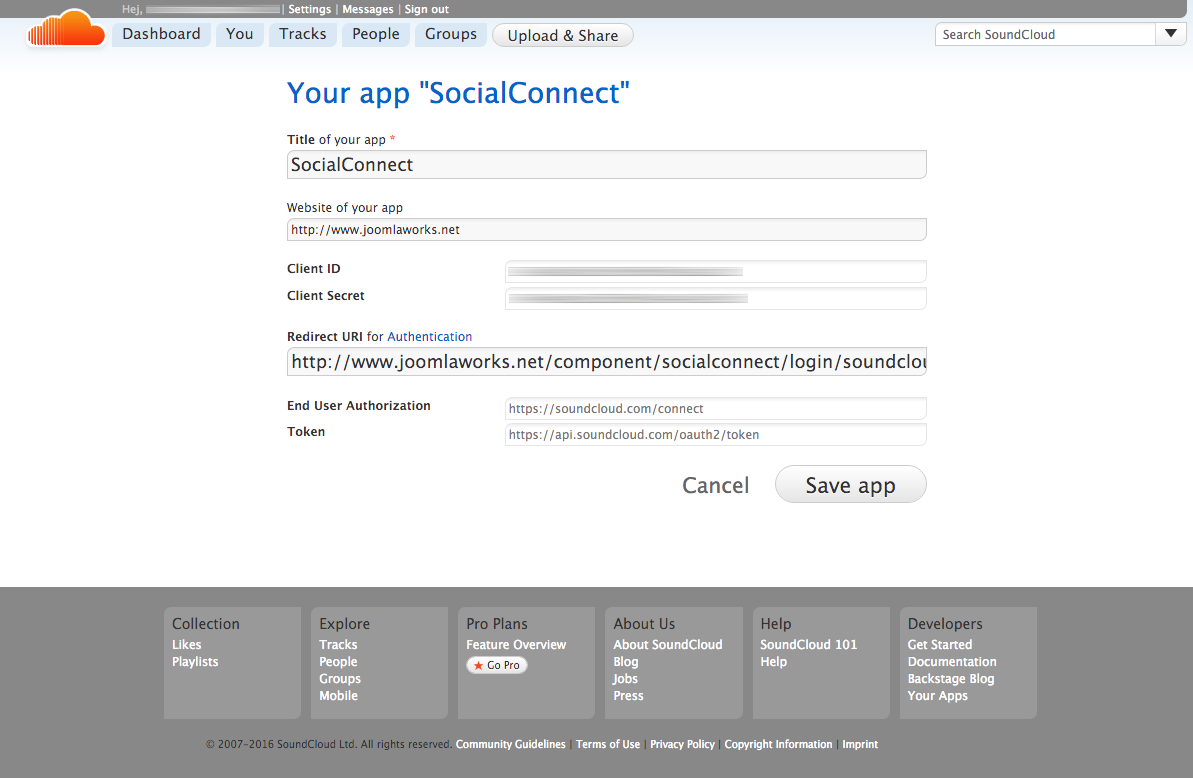
Social Comments Settings
Here you can find options regarding the comments integration. The first option is named " Comments Service " and it allows you to select one of the available comments services. Each of those services require extra setup which is detailed below:
Please have a look at the updated documentation here: https://docs.joomlaworks.net/#/pages/socialconnect/facebook
DISQUS
- DISQUS shortname: The shortname of your DISQUS account. In order to enable DISQUS comments on your system you need to have a DISQUS account. Visit https://disqus.com/ for more information.
- DISQUS Developer mode: This tells DISQUS to render in developer mode. This is usefull while developing in a local environment like a local web server which is not accessible from the web. In production environments you need to set this to "Disabled".
Social Auto Post Settings
In this section you will find options affecting the auto post features of SocialConnect.
- AutoPost layout: This allows you to select the layout of SocialConnect auto post widget. The auto post widget is displayed when editing a K2 item or a Joomla article and allows you to share the content of the item ( or article ) being edited to one or more of the supported social networks. Currently SocialConnect auto post supports Facebook and Twitter only.
Please have a look at the updated documentation here: https://docs.joomlaworks.net/#/pages/socialconnect/facebook
- Post content to Twitter: Set this to "Enabled" if you want to enable the Twitter option to the auto post widget. This requires that you have authorized your Twitter application to post content.
- Post on behalf of: Here you can authorize your Twitter application to post content using the auto post widget to a Twitter account. Click the link named "authorize" and follow the steps as guided by Twitter. Once you complete the process the authorization pop up window will close and you will see the screen name of the Twitter account you authorized. Note that in order to be able to authorize your Twitter application you need to already have setup a Twitter application in the "Social Login Settings".
- Post content to LinkedIn: Set this to "Enabled" if you want to enable the LinkedIn option to the auto post widget. This requires that you have authorized your LinkedIn application to post content.
- Post on behalf of: Here you can authorize your LinkedIn application to post content using the auto post widget to a LinkedIn account. Click the link named "authorize" and follow the steps as guided by LinkedIn. Once you complete the process the authorization pop up window will close and you will see the name of the LinkedIn account you authorized. Note that in order to be able to authorize your LinkedIn application you need to already have setup a LinkedIn application in the "Social Login Settings". Finally note that LinkedIn requires to authorize your application after 60 days. If you get an error message during posting to LinkedIn that the access token in invalid or has expired, you have to repeat the authorization process from the settings page of SocialConnect.
Advanced Settings
- For social logins only, generate usernames from:
- The user's full name. The account of the user will be created using his full name as username. Note that the full name is the name provided by the social network used to sign in.
- The user's email address. The account of the user will be created using his email address as username. Note that the email is the email provided by the social network used to sign in.
- The user's email address encrypted. The account of the user will be created using a hash of his email address as username. Note that the email is the email provided by the social network used to sign in.
- A unique number plus a social network identifier. The account of the user will be created using a generated username based on the social network name and the identifier of the user in that network. For example, users that sign in using a Facebook account will get a username like "xxxxxx@facebook".
Note that SocialConnect does not create any user accounts. SocialConnect just signs in the user. However, Joomla is creating a user account for every user that signs in. If you want to change that behavior you can edit the plugin "User - Joomla" and set the setting named "Auto-create Users" to "No".
System Settings
Here you can find settings regarding the general behavior of SocialConnect.
- StopForumSpam.com integration for user logins: If you enable this, every time a user signs in to your site will be checked for spam activity using the stopforumspam.com API. For more information on this you can visit http://www.stopforumspam.com/ .
- cURL connect timeout: The number of seconds PHP cURL wait while trying to connect. Use 0 to wait indefinitely. This is an advanced setting and usually should not be changed unless you are facing issues while using SocialConnect. You can read the section of this document titled “Troubleshooting” for more information.
- cURL timeout: The maximum number of seconds to allow PHP cURL functions to execute. This is an advanced setting and usually should not be changed unless you are facing issues while using SocialConnect. You can read the section of this document titled “Troubleshooting” for more information.
Here you can find settings that can help you tweaking your system to avoid issues while using SocialConnect. For more information on this please read the section of this document titled “Troubleshooting”.
Permissions
SocialConnect integrates Joomla 2.5/3.x permissions system providing the actions “Configure” and “Access Administration Interface”.
Usage
There are two ways for adding SocialConnect to your site. The first one is using SocialConnect module and the second one is creating a menu link to SocialConnect component. In both cases there are some settings that affect SocialConnect functionality. These settings are common and are covered later in this document.
SocialConnect Module
This is the most common way to add a login block to your site. In order to do this you need to create a module instance of the SocialConnect Login module.
SocialConnect Component
This is an alternative way for adding SocialConnect to your site. It may be useful when you want to have a dedicated login page instead of a login block. In order to do this you need to create a standard Joomla menu link to the SocialConnect component.
Settings
Both of the above methods have identical settings. Lets see them in details:
- Template. Here you can choose the template you wish for the rendering of SocialConnect. The available options here vary depending on the context (module or component) and the available templates to your system. You can learn more about SocialConnect templates by reading the section titled “Templates” of this document.
- Introduction message. Using this option you can show an introduction message to the visitors of your site. Usually this is being displayed by the SocialConnect template in the beginning of the SocialConnect block. The available options here are:
- None. Do not display the message at all.
- Use Default. Display a default text message. The message is coming from the SocialConnect language file.
- Use custom. Display a custom message. Use this so you can type your own message.
- Custom Introduction message. Here you type the custom introduction message you wish. This field is a WYSIWYG editor under Joomla 2.5/3.0 and a textarea under Joomla 1.5. In order to display this message you need to set the “Introduction message” setting to “Use custom”.
- Registration message (SocialConnect component only). Using this option you can show a message to the visitors of your site to encourage them register. Usually this is being displayed by the SocialConnect template right before the registration button. The available options here are:
- None. Do not display the message at all.
- Use Default. Display a default text message. The message is coming from the SocialConnect language file.
- Use custom. Display a custom message. Use this so you can type your own message.
- Sign in message (SocialConnect component only). Using this option you can show a message to the visitors of your site to encourage them sign in to your site. Usually this is being displayed by the SocialConnect template right before the sign inform. The available options here are:
- None. Do not display the message at all.
- Use Default. Display a default text message. The message is coming from the SocialConnect language file.
- Use custom. Display a custom message. Use this so you can type your own message.
- Footer message (SocialConnect module only). Using this option you can show a message to the visitors of your site. Usually this is being displayed by the SocialConnect template in the end of the SocialConnect module. The available options here are:
- None. Do not display the message at all.
- Use Default. Display a default text message. The message is coming from the SocialConnect language file.
- Use custom. Display a custom message. Use this so you can type your own message.
- Login Redirection URL. Select a menu item of your site to redirect the user after a successful login.
- Logout Redirection URL. Select a menu item of your site to redirect the user after a successful logout.
- Encrypt Login Form. Submit encrypted login data (requires SSL). Do not enable this option if Joomla is not accessible using the https:// protocol prefix.
- Render Menu. Select a Joomla menu to be rendered when user is logged in.
Templates
You can use HTML and CSS template overrides inside your Joomla template and completely change the way SocialConnect elements display on your website! You can either choose to use the versatile base styling of the bundled SocialConnect templates or simply override them (both the HTML and CSS code). Below are the instructions to make SocialConnect overrides depending on the SocialConnect usage (module or component).
Module Templates
Module templates are located in the directory /modules/mod_socialconnect/tmpl/. The SocialConnect module comes with two ready-to-use templates.
In order to override the built-in module templates you can simple copy /modules/mod_socialconnect/tmpl/TEMPLATE folder within your Joomla template's /templates/YOUR_JOOMLA_TEMPLATE/html/mod_socialconnect/ folder (create it if it doesn't exist). Whatever changes you do from now on within this folder, will completely override the SocialConnect output, exactly as you would with any other MVC module in Joomla.
Alternatively you can create your own template (as a folder of files) inside /templates/YOUR_JOOMLA_TEMPLATE/html/mod_socialconnect/. There is no need to place your template to the module templates directory as the module settings can check your Joomla template files for any custom module templates as well.
The SocialConnect module uses two layouts: one for guests and one for authenticated users (along with one associated CSS file). You are able to override all files or selected files, as you would with any other MVC module, with the better exception that SocialConnect can override CSS as well.
Below you can see the file structure of a SocialConnect module template folder:
authenticated.php
default.php
/images
/css
|-- style.css
If you maintain this structure within /templates/YOUR_JOOMLA_TEMPLATE/html/mod_socialconnect/CUSTOM_TEMPLATE you can override the entire module output.
Component Templates
Component templates are located in the directory /components/com_socialconnect/templates/. The SocialConnect component comes with three ready-to-use templates.
In order to override the built-in component templates you can simple copy /components/com_socialconnect/templates/TEMPLATE (folder) within your Joomla template's /templates/YOUR_JOOMLA_TEMPLATE/html/com_socialconnect/ folder (create it if it doesn't exist). Whatever changes you do from now on within this folder, will completely override the SocialConnect component output, exactly as you would with any other MVC component in Joomla.
Alternatively you can create your own template (as a folder of files) inside /templates/YOUR_JOOMLA_TEMPLATE/html/com_socialconnect/. There is no need to also place your template to the component templates directory.
The SocialConnect component uses these layouts: one for guests, one for authenticated users and one for the email prompt for social networks that do not provide a user's email account from their API (we do this because Joomla requires an email address to create a user account). It also has one CSS file. You are able to override all files or selected files, as you would with any other MVC component, with the better exception that SocialConnect can override CSS as well.
Below you can see the file structure of a SocialConnect component template folder:
authenticated.php
default.php
twitter.php
/images
/css
|-- style.css
If you maintain this structure within /templates/YOUR_JOOMLA_TEMPLATE/html/com_socialconnect/CUSTOM_TEMPLATE you can override the entire component output.
Troubleshooting
In case you are facing issues with SocialConnect there are some simple steps you can take in order to resolve them. SocialConnect prints the error messages on the screen in order to help you identify the cause of the issue.
In general there are two kind of issues that you may face while using SocialConnect.
Server/networking errors
SocialConnect uses PHP's cURL functionality to make requests to social networks. So just make sure cURL is properly setup in your server. SocialConnect provides two additional settings under it's configuration to mitigate slow networks or connectivity issues:
- cURL connect timeout. The number of seconds PHP cURL will wait while trying to connect.
- cURL timeout. The maximum number of seconds to allow PHP cURL functions to execute.
Try to set both of those values to a high enough value (100 for example) if you are facing server/networking issues.
Social network errors
If you get an error message like “401: Failed to validate oauth signature and token” then that means that you have not setup correctly the social network you are trying to authenticate with.
In that case read again the corresponding section of this document regarding the setup of the specific network and check again that you have completed everything as required.